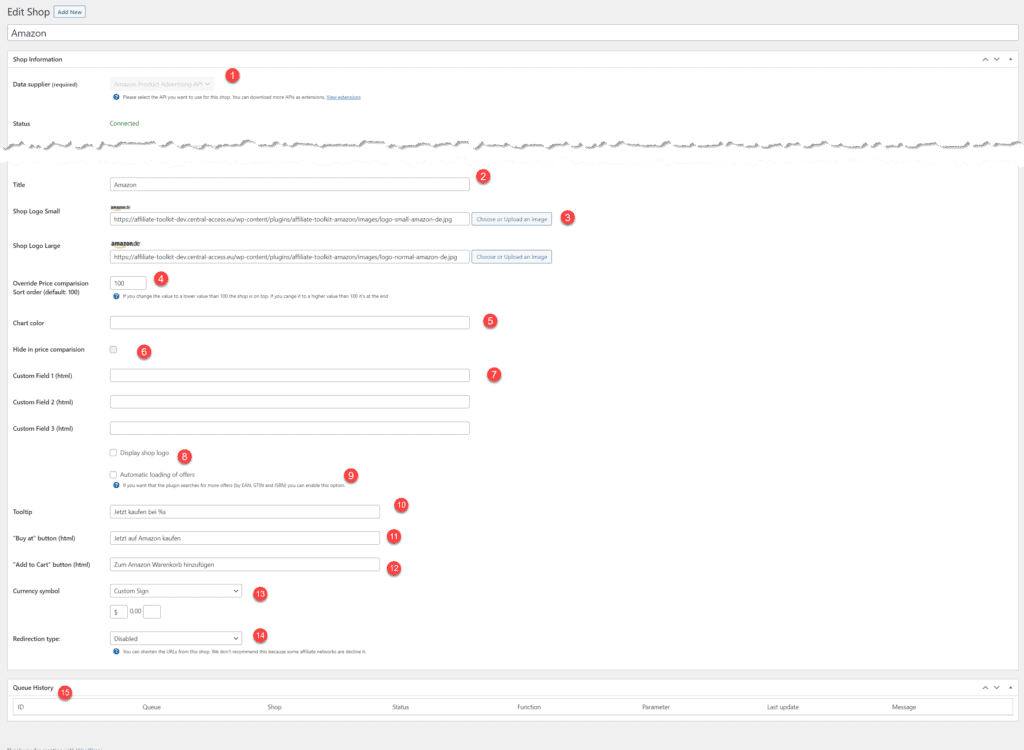
The shop in our plugin holds everything you need to connect to the interface. Besides access data, you can also define name, logo and many other settings. The shop runs through the whole plugin.
If you want to import products, you must first create the respective store.
You can do that directly under affiliate-toolkit -> Shops -> New Shop.
There are general settings for a shop (e.g. name, logo,..) and API specific settings. In this article you will learn the general settings.

This is the interface to which a connection is to be established. This interface cannot be changed after the initial save.
The status usually shows "connected" but it can also show the error message in case of connection problems. This status is basically only for the initial verification of the access data.
Over time, the credentials for the respective API may expire. In that case, the "Status" would not change to Error until you manually click "Update".
This is the title which will be displayed in the product boxes and in the frontend. In the backend, you will always see the single post title at the top.
These shop logos (if available) are displayed with the respective product box. For most of the stores we deliver the store logos automatically. For some others, these must be set manually.
This can be used to influence the sorting of the offers. 100 corresponds to "sorted by price". If you now set the price to 90, the price for the store will be displayed at the top. If you set the store to 110, it will be displayed at the bottom.
If you display price history on your website, you can specify a color here instead of the automatic color.
This will hide the store in the price comparison. We recommend simply deactivating the automatic offer search here.
These fields can be used for your own purposes. Here, for example, values such as general shipping costs can be specified. These can then be displayed in the template.
If you want to display the fields in a listing of multiple offers, use the following snippet (fields 1-3):
{!! $offer->shop->customfield1 !!}
{!! $offer->shop->customfield2 !!}
{!! $offer->shop->customfield3 !!}
If you want to display the fields for a product, use the following snippet (fields 1-3):
{!! $product->shop->customfield1 !!}
{!! $product->shop->customfield2 !!}
{!! $product->shop->customfield3 !!}This checkbox activates the display of the store logos. If not active, only the store name is displayed. By the way, this is a very common error with missing store logos.
This option activates the search of offers in this store. Means concretely: If you import a product from another store (e.g. Amazon) and this product has an EAN, the plugin will automatically search for an offer in this store with the EAN.
This is the mouse tooltip which is displayed when a button is hovered. %s is the placeholder for the store name here.
This button is the primary button text for the product boxes. %s can be used again as a store placeholder. HTML can also be used here.
<i class="fa fa-amazon" aria-hidden="true"></i>
Buy at AmazonHere the same applies as for the "Buy at" button. By the way, this is the secondary button.
By default, the currency is displayed in euros. Here you can use different formatting or enter your own representation.
"Use icon from merchant" means that the price is displayed directly from the interface without reformatting. In some cases conversion errors may occur and here this option is good as an alternative.
This can be used to shorten links. We don't recommend using this feature because it takes longer with shortening and some shortened affiliate links are blocked in browsers.